A Sixteen-Kilobyte RISC-V Chip, No Vendor IDE Required
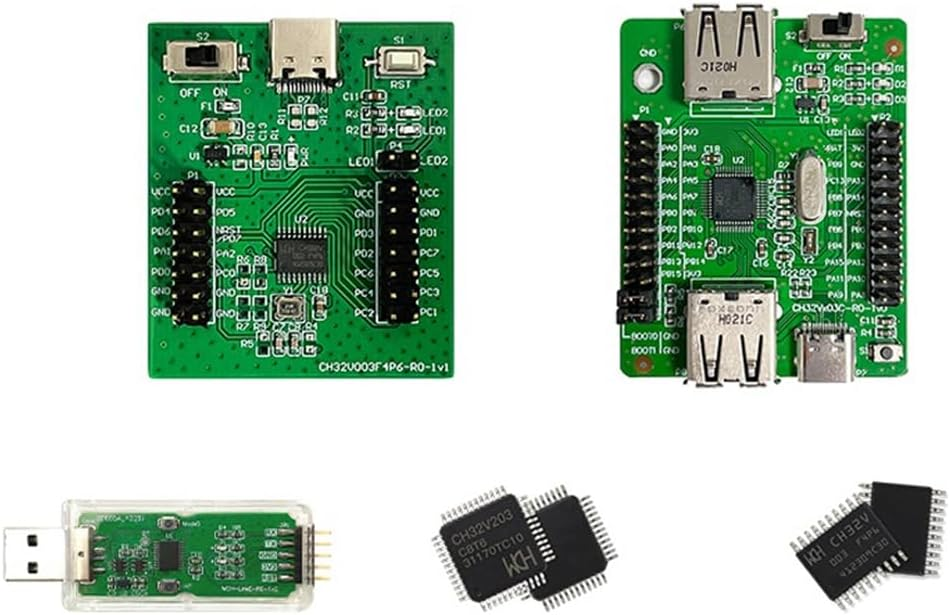
The CH32V003 is WCH's entry-level RISC-V microcontroller: a QingKe V2A core running the RV32EC instruction set, 16 KB of flash, 2 KB of SRAM, and a price that undercuts even the classic 8051 boards this site already covers. It has no built-in UART bootloader the way the STC89C52RC does — instead, programming and debugging both go through a small USB probe called WCH-LinkE, talking to the chip over a single debug wire.
Everything WCH ships for this part assumes MounRiver Studio, their own Eclipse-based IDE. This page sets up something else: the same minimalist, no-proprietary-IDE workflow already in use for the STC89C52RC + SDCC + Geany page — a standalone GNU RISC-V cross-compiler, a Makefile or batch file, a second independent Geany profile, and WCH's own small flashing GUI as the one remaining manual step.
What's in the Kit, and the Case of the Missing DIP Socket
If you've used AVR or 8051 programmers before, it's natural to expect a ZIF socket or DIP header the programmer clips directly into. The CH32V003 boards have no such socket, and none is needed. WCH's own evaluation-board manual says it plainly: the debug interface is for “downloading, simulation debugging, single-wire communication, only need SWDIO to connect PD1.”
The QingKe V2A core uses a proprietary single-wire debug interface, not the two-wire ARM SWD protocol you may recognize from STM32 parts. One signal pin — PD1 — carries all programming and debug traffic. Add power and ground and the entire connection between WCH-LinkE and the board is three ordinary jumper wires into header pins the board already exposes — no socket, no adapter, no special connector to buy.
| WCH-LinkE pin | Board pin (header P1) | Purpose |
|---|---|---|
| 3V3 | VCC | Power. Don't also power the board over USB at the same time unless you know both rails agree. |
| GND | GND | Common ground. |
| SWDIO / RMS | PD1 | Single-wire debug / programming (SWIO). |
| SWCLK / TCK | not connected | Unused — CH32V003 is single-wire only. |
A Note on “GCC” and Why You Need a Second Copy of It
It's tempting to think that because GCC's own manual lists RISC-V options (-march, -mabi, and so on) right alongside every other architecture it supports, any gcc.exe you already have can just be pointed at those flags. It can't — a given GCC binary is built for exactly one target. The Windows GNU toolchain most people use for things like gfortran is built to target x86_64-w64-mingw32 and produces native Windows executables; the RISC-V code generator simply isn't present in it.
What's needed is a second GCC build — same compiler family, entirely different --target — distributed as its own uniquely-prefixed binaries: riscv-none-elf-gcc.exe, riscv-none-elf-objcopy.exe, and so on. Because every filename is prefixed, it can't collide with a plain gcc.exe or gfortran.exe even sharing the same PATH. This setup goes one step further and skips PATH entirely — the Makefile and batch file below take the RISC-V toolchain's location as an explicit variable, so nothing about your existing GNU Tools install is touched.
The recommended distribution is the free, standalone xPack GNU RISC-V Embedded GCC (riscv-none-elf-gcc) — unzip it, note the path to its bin folder, done.
Flashing with WCH-LinkUtility
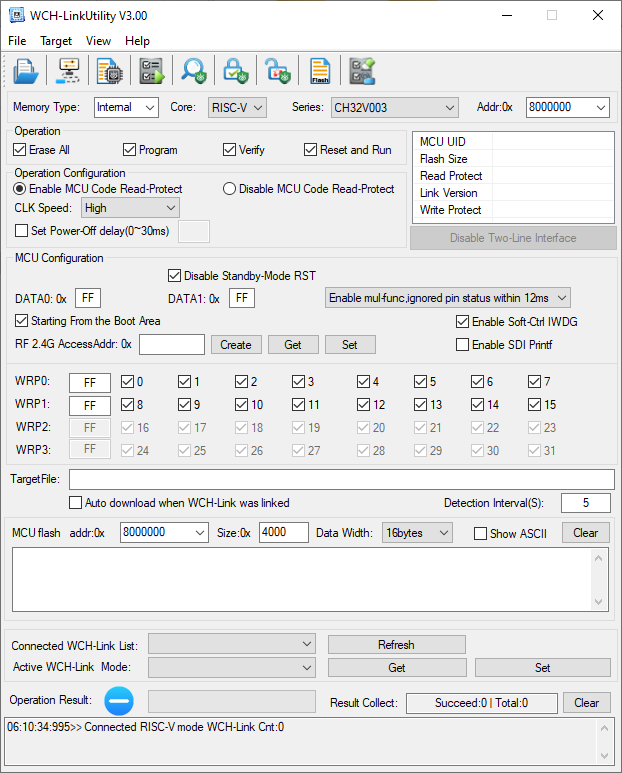
Until a command-line flasher is wired into the build, WCH-LinkUtility's small GUI does the flashing:
- Launch
WCH-LinkUtility.exeand set Core: RISC-V, Series: CH32V003, Addr: 0x8000000. - Leave Erase All, Program, Verify, and Reset and Run all checked — the standard flash-and-go combination.
- Browse Target File to the
.hexproduced by the build below. - Wire WCH-LinkE per the table above, plug it into USB, and confirm the status line reads
Connected RISC-V mode WCH-Link Cnt:1. - Run the combined operation and watch Result Collect for
Succeed:1 | Total:1.
The Toolchain
Three pieces, mirroring the STC workflow:
- xPack GNU RISC-V Embedded GCC — a standalone, cross-compiling build of GCC targeting
riscv-none-elf, driven from a Makefile or batch file, no installer. - Geany — a second, independent profile from the one already set up for SDCC/8051 (launched with its own
-cconfig path), with its own Build Commands wired to this chip's batch file. - WCH-LinkUtility — WCH's own small flashing GUI, used here as the one manual step until a command-line flasher replaces it.
Toolchain Flags, and Why Each One Is There
CH32V003 being RV32EC isn't quite enough on its own to hand GCC:
- CSR and
fence.iinstructions — recent binutils split these out of the base ISA string into separate extensions. WCH's own core-access code uses both, so the working architecture string is-march=rv32ec_zicsr_zifencei, not the barerv32ecyou'd expect from the datasheet alone. - ABI —
-mabi=ilp32e, matching the reduced 16-registerEcalling convention. - C library size — the default (full) newlib pulled in by
-lcalone overflowed the 16 KB flash budget by roughly 35 KB before any of this project's own code was even linked in. Adding--specs=nano.specs(newlib-nano) brings the whole blink example, printf support included, down to 6.9 KB text / 704 B RAM.
This exact Makefile and flag set were verified end-to-end, not just written from documentation: compiled and linked cleanly with xPack riscv-none-elf-gcc 14.2.0, producing a working image that fits the target's 16 KB/2 KB budget with headroom to spare.
+-------------------------+
| Write main.c (GPIO,     |
| pulled from WCH's own   |
| GPIO_Toggle example)    |
+-------------------------+
           |
           v
+-------------------------+
| riscv-none-elf-gcc      |
| -march=rv32ec_zicsr_    |
|   zifencei -mabi=ilp32e |
| --specs=nano.specs      |
| -> .elf -> .hex          |
+-------------------------+
           |
           v
+-------------------------+
| WCH-LinkUtility:        |
| Erase All / Program /   |
| Verify / Reset and Run  |
+-------------------------+
           |
           v
+-------------------------+
| PD0 toggles every       |
| 250 ms                  |
+-------------------------+
The Example: GPIO Blink
void GPIO_Toggle_INIT(void)
{
    GPIO_InitTypeDef GPIO_InitStructure = {0};

    RCC_APB2PeriphClockCmd(RCC_APB2Periph_GPIOD, ENABLE);
    GPIO_InitStructure.GPIO_Pin = GPIO_Pin_0;
    GPIO_InitStructure.GPIO_Mode = GPIO_Mode_Out_PP;
    GPIO_InitStructure.GPIO_Speed = GPIO_Speed_30MHz;
    GPIO_Init(GPIOD, &GPIO_InitStructure);
}

int main(void)
{
    u8 i = 0;
    NVIC_PriorityGroupConfig(NVIC_PriorityGroup_1);
    SystemCoreClockUpdate();
    Delay_Init();
    USART_Printf_Init(115200);
    GPIO_Toggle_INIT();

    while(1)
    {
        Delay_Ms(250);
        GPIO_WriteBit(GPIOD, GPIO_Pin_0, (i == 0) ? (i = Bit_SET) : (i = Bit_RESET));
    }
}
Pulled directly from CH32V003EVT.ZIP\EVT\EXAM\GPIO\GPIO_Toggle. A full scan of all 423 example source files in WCH's package found only a handful of stray non-English punctuation marks in two unrelated SPI examples (since corrected) — nothing in this one. WCH's own example source was already in English; the actual work here was building an original, standalone command-line build system around it.
Geany Build Commands
As with the STC workflow, Geany calls build commands directly without a shell in front of them, so the batch file needs the same cmd /c prefix:
- Label: Build
- Command:
cmd /c build_ch32v003.bat
Optional: Seeing printf Output (UART Debug)
The example's printf calls ride on USART1 (PD5 TX, 115200 8N1) and need a USB-to-serial adapter to actually view — the blink itself works with or without one. The recommended part is a genuine FTDI FT232RL, not a CH340-based module, carrying the same reasoning forward from the CH340 VSP driver on the STC89C52RC boards this site already covers:
- The FT232RL isn't end-of-life, comes in an SSOP-28 package that's easy to hand-solder or design onto your own board, and Windows has shipped a native VCP driver for it for years — plug it in and it just enumerates as a COM port, no manual driver install.
- A CH340-based adapter is entirely fine for your own bench development (it's what talks to the STC89C52RC's bootloader on those boards). But USB-serial bridge chips as a category have a real history of Windows driver updates silently blocking clones and counterfeits — FTDI's own infamous 2014 driver update did exactly this to counterfeit FT232 chips, and PL2303 saw something similar around 2012. Whether that specific risk currently applies to genuine CH340 silicon isn't something asserted here either way; the point is that a part destined for someone else's Windows machine isn't the place to gamble the few dollars saved.
- In short: CH340 for your own prototyping, FTDI (FT232RL or the newer FT230X) for anything that will ship to an end user who expects it to just work.
This is a standing convention across this site's guides, not a one-off choice for this chip.
Get the Full Write-Up
The complete guide covers the xPack GCC install, the full annotated Makefile and build_ch32v003.bat, exact Geany Build Command settings, the WCH-LinkUtility walkthrough with screenshots, and a troubleshooting section built from the actual build errors this exact toolchain combination produces the first time through (missing zicsr/zifencei, flash overflow from full newlib, and more).
Where This Goes Next
This page deliberately stops at “GUI flashing tool, command-line build.” The natural next step — mirroring how the STC89C52RC page replaced STC-ISP with a from-scratch C flasher — is a command-line flashing utility for WCH-LinkE, so that make flash becomes as real a target as make all. WCH-LinkUtility's own protocol isn't publicly documented, but community projects (most notably minichlink, part of the open-source ch32v003fun project) have already reverse-engineered and open-sourced exactly this, and are the logical next stop once this last loop is worth closing.